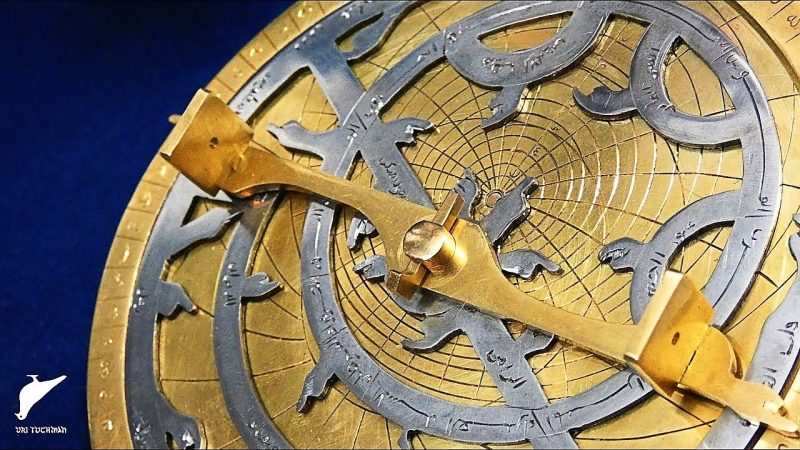
There is a special kind of magic in watching a flat sheet of brass become an instrument that can read the sky. Not magic in the “wizard with a beard” sense, though an astrolabe certainly looks like something a wizard would keep beside a suspiciously large telescope. The real magic is older, quieter, and far more impressive: careful layout, patient filing, controlled sawing, clean engraving, and a deep respect for geometry.
An astrolabe is one of history’s most elegant analog computers. Long before apps told us when the sun would set, where Mars was hiding, or whether a star was actually a plane, this circular instrument helped astronomers, navigators, teachers, and scholars model the visible heavens. It could be used to tell time, measure celestial altitude, estimate latitude, follow the sun’s annual path, and understand the movement of stars. And the most charming part? It does all of this without batteries, Wi-Fi, subscriptions, or a notification asking you to rate the app.
The title “Simple Hand Tools Turn Brass And Steel Into An Amazing Astrolabe” captures more than a clever workshop project. It points to a bridge between ancient science and modern making. With brass, steel, a fretsaw, files, drills, gravers, dividers, and enough patience to outlast a rainy weekend, a maker can recreate an instrument that once represented the cutting edge of astronomy and craftsmanship.
What Is an Astrolabe?
An astrolabe is a portable astronomical calculating instrument. The word is often interpreted as “star-taker,” which sounds dramatic but is surprisingly accurate. In simple terms, the astrolabe helps its user “take” the position of a star or the sun and translate that observation into useful information.
The classic planispheric astrolabe is a round device made of several layered parts. The main body is called the mater, or “mother,” because it holds the other components. Inside it sits one or more engraved plates, often called tympans or climate plates, each designed for a specific latitude. Above that is the rete, a delicate rotating star map that often looks like a beautiful web of metal. On the back is usually an alidade, a rotating sighting rule used to measure the altitude of the sun or a star above the horizon.
To modern eyes, an astrolabe may look like decorative jewelry that got promoted to scientific management. But every curve, pointer, scale, and inscription has a job. The rete represents the sky. The plates represent the observer’s local horizon and altitude lines. The engraved scales translate motion into time, date, position, and angle. It is art, math, astronomy, and mechanical design stacked into one palm-sized masterpiece.
Why Brass and Steel Are Perfect for an Astrolabe
Historical astrolabes were often made from brass because it is durable, workable, attractive, and resistant to corrosion. Brass engraves cleanly, polishes beautifully, and has enough stiffness to hold fine detail. It also develops a warm golden glow that makes even a slightly dusty workbench feel like a museum exhibit.
Steel adds contrast and strength. A steel alidade, pointer, pin, or structural part can create a handsome visual balance against brass. In a handmade astrolabe, the contrast between brass and steel is more than cosmetic. It helps separate moving parts visually, making the instrument easier to read. It also gives the finished piece that “ancient machine found in a scholar’s drawer” look, which is frankly half the fun.
The Beauty of Building With Simple Hand Tools
In a world full of CNC routers, laser cutters, 3D printers, and desktop mills, building an astrolabe with simple hand tools feels almost rebellious. It says, “Yes, technology is wonderful, but also watch me make a precision instrument with a saw, a file, and stubbornness.”
The basic hand-tool process usually includes marking the design, cutting the metal, drilling holes, filing edges, refining the moving parts, engraving scales and inscriptions, and polishing the final surfaces. None of these steps requires a factory. What they do require is attention. An astrolabe punishes rushing. Cut too aggressively and a delicate star pointer bends. Drill carelessly and the rotating parts wobble. Engrave without planning and your scale starts looking like it was labeled during an earthquake.
Common Hand Tools Used in an Astrolabe Build
A handmade brass and steel astrolabe can be built with a modest toolkit. A jeweler’s saw or fretsaw handles the fine interior cuts of the rete. Files refine the outline and smooth rough edges. A hand drill or small drill press creates pivot holes and screw openings. Dividers and scribers mark circles, scales, and layout lines. Gravers or engraving tools cut numbers, letters, star names, and decorative markings. Sandpaper, polishing compound, and cloth bring the surface to life.
The surprise for beginners is that the simple tools are not the limiting factor. The limiting factor is usually patience. Brass does not care that you are excited. Steel does not care that dinner is in 20 minutes. Hand engraving does not care that you already told someone, “I’m almost done.” The metal only rewards steady work.
The Main Parts of a Handmade Astrolabe
The Mater: The Foundation
The mater is the body of the astrolabe. It is usually a circular brass plate with a raised rim or recessed center. This part must be flat, strong, and accurately shaped because everything else depends on it. If the mater is uneven, the rotating pieces may scrape or wobble. If the center hole is off, the instrument’s geometry loses accuracy.
When making the mater by hand, the maker first lays out the outer circle and inner recess. After cutting and filing the shape, the surface may be engraved with degree markings, hour scales, or decorative borders. This is where the astrolabe starts to become more than a disk. It becomes a measuring instrument.
The Tympan: The Local Sky Plate
The tympan is where geography enters the story. Because the visible sky changes depending on latitude, an astrolabe plate is usually designed for a particular location. A plate made for New York will not perfectly match the sky in Miami. A plate made for London will not behave the same way in Los Angeles.
The tympan often shows altitude circles, azimuth lines, the horizon, and other projected celestial coordinates. These lines are based on stereographic projection, a mathematical method for mapping the curved sky onto a flat surface. That sounds intimidating, but the principle is wonderfully practical: turn the dome of the heavens into a usable diagram.
The Rete: The Star Map
The rete is the showpiece. It is the openwork rotating star map that sits above the plate. In historical examples, the rete can be simple and functional or wildly decorative. Some include pointers shaped like leaves, flames, hands, or animal forms. The maker’s personality often sneaks into this part, usually wearing a tiny engraved hat.
Cutting the rete by hand is one of the most demanding parts of the build. The piece must be delicate enough to reveal the plate underneath, but strong enough not to twist or snap. Every star pointer must land where it belongs. Every curve must be cleaned with files. This is where the fretsaw becomes both a tool and a test of character.
The Alidade: The Sighting Rule
The alidade is mounted on the back of the astrolabe and used to sight the sun or a star. By aligning the sighting vanes with the celestial object, the user can read its altitude from the scale around the instrument. This measurement can then be used with the front of the astrolabe to solve practical astronomical problems.
For safety, no one should stare directly at the sun through sighting holes. Traditional solar observations can be made by aligning the instrument so sunlight passes through one vane and falls onto the other. The sun is useful, but it is also the universe’s least forgiving flashlight.
How an Astrolabe Works Without Electronics
An astrolabe works because the sky follows predictable patterns. Stars appear to rise and set as Earth rotates. The sun follows a yearly path along the ecliptic. The altitude of celestial bodies changes with time, date, and location. The astrolabe converts those patterns into rotating geometry.
First, the user measures the altitude of a known star or the sun using the alidade. Then the front of the instrument is adjusted so the corresponding point on the rete matches that altitude on the plate. Once aligned, the astrolabe can reveal the time, show which stars are above the horizon, estimate sunrise and sunset, or demonstrate the relationship between the observer and the sky.
This is why the astrolabe is often described as an analog computer. It stores astronomical information in physical form. Its “software” is engraved into brass. Its “processor” is the user’s hand. Its “screen” is a rotating web of metal. Best of all, it never asks for an operating system update at the exact moment you need it.
From Ancient Science to Modern Workshop
The astrolabe has deep roots in Greek astronomy, Islamic scientific culture, medieval education, and early navigation. Scholars in the Islamic Golden Age refined and expanded the instrument, using it for astronomy, timekeeping, prayer times, and orientation. European scholars later adopted and studied astrolabes, and Geoffrey Chaucer famously wrote a treatise explaining the instrument in Middle English.
Mariners used simplified versions for navigation, especially to measure the altitude of the sun or stars and estimate latitude. These nautical instruments were often heavier and more open in design so they could hang more steadily in wind at sea. Eventually, quadrants, octants, sextants, accurate clocks, and modern navigation tools replaced astrolabes for practical use. Still, the astrolabe remains one of the most beautiful examples of human problem-solving ever made from metal and math.
Why Handmade Astrolabes Still Matter
A handmade astrolabe is not merely a decorative object. It teaches patience, geometry, tool control, astronomy, history, and humility. Humility is especially important when your third attempt at a clean circle looks like a potato that studied abroad.
Making one by hand forces the builder to understand the instrument in a way that buying one never can. You learn why the center pivot matters. You learn why fine engraving must be legible. You learn why burrs are tiny villains. You learn that brass is friendly until it is not, and that steel has no interest in your excuses.
More importantly, you begin to appreciate the ancient makers who produced astonishingly precise instruments without digital measurement, electric lighting, or online tutorials. Their work was not primitive. It was disciplined, mathematical, and deeply skilled. A handmade astrolabe reminds us that “old technology” is not the same as “simple technology.” Sometimes it is sophisticated technology wearing a brass coat.
Practical Lessons From Building a Brass and Steel Astrolabe
Accuracy Begins Before Cutting
The best metalwork begins with layout. Before a saw touches brass, the design must be transferred accurately. Center points, circles, scales, and cut lines should be checked more than once. A tiny error near the center can become a large error at the rim. Measure twice, cut once, then measure again because brass has trust issues.
Filing Is Where the Shape Becomes Honest
Sawing removes material quickly, but filing creates the final line. A good file can correct rough cuts, refine curves, and make the instrument feel professional. The trick is to file deliberately and keep checking the shape. Over-filed metal cannot be put back without entering the tragic world of solder, patches, and regret.
Engraving Gives the Astrolabe Its Voice
Engraving is more than decoration. The scales, symbols, and labels are how the instrument communicates. Clean engraving makes the astrolabe usable. Decorative engraving makes it memorable. Whether the markings are Arabic script, Latin star names, numerals, or modern labels, they should be planned with spacing and readability in mind.
Movement Should Feel Smooth, Not Loose
The rotating parts of an astrolabe should move freely without wobbling. This depends on flat surfaces, clean holes, proper washers, and a well-fitted center pin or screw. Too tight, and the rete scratches the plate. Too loose, and the readings feel sloppy. The goal is that satisfying mechanical glide that makes you rotate the piece five extra times for no educational reason whatsoever.
Experience Section: What It Feels Like to Make an Astrolabe by Hand
Working on a handmade astrolabe is not like assembling a shelf or fixing a leaky faucet. It feels more like entering a conversation with people who lived centuries before you and somehow expected you to bring your own files. The first experience is usually surprise. A drawing on paper looks manageable. A brass sheet on the bench looks innocent. Then you begin cutting the rete, and suddenly every curve seems to have signed a contract with chaos.
The most memorable part is the rhythm. Saw, pause, breathe, turn the work, saw again. The blade is thin and dramatic. It breaks if pushed too hard, wanders if guided too lazily, and rewards the steady hand. At first, the work feels painfully slow. Then, after a while, slowness becomes the point. The astrolabe teaches you that precision is not a single heroic act. It is a hundred small decisions made without rushing.
Filing brings another lesson. You start with rough edges that look like they were chewed by a very determined squirrel. Gradually, the curves sharpen. The brass begins to look intentional. Each pass of the file removes a little evidence of struggle. There is satisfaction in that. Unlike digital work, where an undo button can erase mistakes instantly, hand metalwork makes you negotiate with every mark. You do not delete errors; you refine around them.
Engraving is the stage where confidence and terror shake hands. A clean engraved line is beautiful. A slipped line is also permanent, just less emotionally supportive. The first few cuts may feel awkward, but the tool eventually starts to make sense. You learn how much pressure the brass wants. You learn how to turn curves instead of forcing them. You learn that good lighting is not optional; it is the difference between a graceful scale and a mysterious decorative injury.
Polishing the finished astrolabe is the reward. The metal brightens, the contrast between brass and steel appears, and the instrument suddenly looks like it belongs in a cabinet of wonders. But the real reward is not shine. It is understanding. By the end, the astrolabe is no longer just an object. You know where the difficult cuts are. You remember which line took three tries to engrave cleanly. You can feel the hours in the metal.
The best experience comes when you finally hold the astrolabe upright and move the alidade. Even if the instrument is more educational than museum-grade, it feels alive. You are holding a mechanical map of the sky made by your own hands. That moment explains why people still build these devices. It is not only about astronomy. It is about proving that simple tools, careful work, and curiosity can still turn raw material into wonder.
Conclusion
Simple hand tools can turn brass and steel into an amazing astrolabe because the true power of the project is not hidden in expensive equipment. It is hidden in layout, patience, geometry, and skilled hands. An astrolabe is a reminder that science and art were never strangers. They have been sharing a workshop for centuries.
Building one today connects modern makers with ancient astronomers, medieval scholars, navigators, engravers, and instrument makers. It shows how a few moving parts can model the sky, how metal can hold mathematics, and how craftsmanship can make knowledge beautiful. In an age when most devices are sealed boxes, a handmade astrolabe is refreshingly open. You can see how it works. You can touch the mechanism. You can follow the logic engraved into its surface.
And perhaps that is why the astrolabe still fascinates us. It does not merely measure the heavens. It reminds us that human beings have always looked up, asked questions, and then reached for the nearest tool.
Note: This article is written for educational and editorial publishing purposes. Anyone attempting a metalworking project should use proper eye protection, safe clamping, ventilation, and careful tool handling.