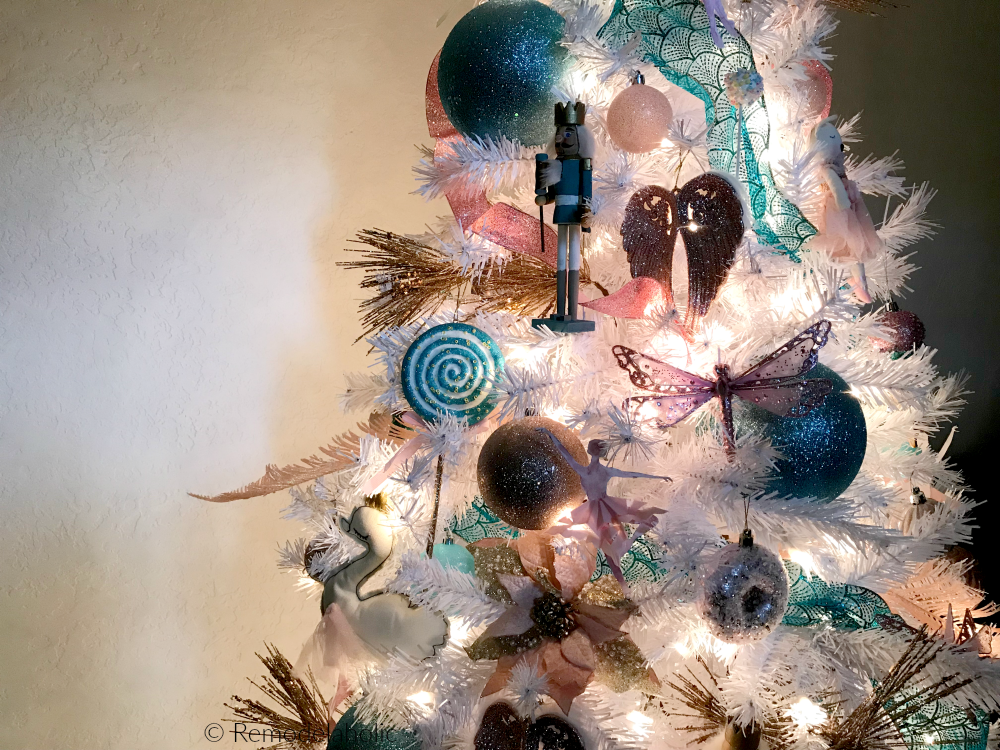
If classic Christmas had a glamorous alter ego, it would absolutely be a blue, pink, and gold Nutcracker Christmas tree. You get the storybook charm of toy soldiers and Sugar Plum vibes, plus a color palette that looks like it walked straight out of a fancy holiday window display and said, “Yes, I sparkle on purpose.”
This tutorial is built for real homes (and real humans). No “perfect tree unicorn” required. Whether you’re decorating a full-size living room tree, a slim pencil tree, or a “my apartment is basically one hallway” tree, you’ll learn how to layer ribbon, ornaments, nutcrackers, and picks so the whole thing feels intentionalnot like you fought a craft store and the craft store won.
Why Blue, Pink, and Gold Works So Well for a Nutcracker Theme
Nutcracker décor naturally leans theatrical: uniforms, metallic details, and a bit of ballet-stage drama. Blue brings a wintery, regal base. Pink adds that Sugar Plum Fairy sweetness (without making your tree look like a cupcake… unless you want that, and honestly, respect). Gold ties everything together by reflecting light and making the whole tree glow like it’s getting paid to be pretty.
The secret is balance: cool tones (blue), warm tones (gold), and a soft accent (pink). When you spread those three colors evenlyand vary finishes like matte, shiny, glitter, velvet, and satinyou get depth instead of chaos.
Quick Shopping List (So You Don’t End Up Buying 47 Things You Don’t Need)
Core supplies
- Tree: green, flocked, or lightly frosted (blue/pink/gold pops on all three)
- Lights: warm white (or a warm-white + soft twinkle mix if you like drama)
- Ribbon: at least two wired ribbons (three if you want a designer look)
- Garland (optional but highly recommended): gold beads, pearl beads, or glitter rope
- Ornaments: assorted sizes, plus a few oversized “wow” pieces
- Nutcracker elements: nutcracker ornaments, mini nutcracker figures, ballet/sugar-plum accents
- Picks & sprays: gold leaves, frosted branches, glitter stems, poinsettia picks (pink or champagne)
- Tree topper: a big bow, star, crown, or a nutcracker-themed topper
- Tree base: skirt, collar, or a basket
Ribbon suggestions for this color palette
- Blue: velvet wired ribbon (navy, sapphire, or dusty ice-blue)
- Pink: satin wired ribbon (blush, ballet-pink, or rose)
- Gold: metallic mesh, gold-threaded ribbon, or champagne brocade
Step 1: Pick Your “Color Story” Before You Touch the Tree
The fastest way to make your tree look expensive is to decide what your tree is about. Not spiritually (although, sure, it’s about joy), but visually. Here are three foolproof “stories” for a Nutcracker tree in this palette:
- Regal Nutcracker: deep sapphire + antique gold + soft blush accents
- Sugar Plum Dream: blush + icy blue + bright gold sparkle
- Modern Ballet Luxe: champagne gold + pale pink + muted slate-blue
Choose one as your lead vibe, then stick with it when selecting ornaments. (This is how you avoid the dreaded “every ornament I’ve ever owned” look, also known as “garage sale chic.”)
Step 2: Fluff Like You Mean It (Yes, This Matters)
Before you add a single ribbon tail, shape the tree. Work from the inside out and top to bottom, spreading branches so the tree looks full and natural. If it’s artificial, bend branch tips slightly so it feels less like a perfect triangle and more like an actual tree that has opinions.
Step 3: Light It for Glow, Not for “I Can See the Wire From Space”
Warm white lights are your best friend for blue/pink/gold. They soften the cool tones and make gold look buttery instead of brassy. If your tree isn’t pre-lit, aim for plenty of lights so the tree shines from the inside.
Lighting method that looks designer
- Start near the trunk and weave outward to branch tips, then back inrepeat as you go.
- Wrap key branches if you want a richer look (especially on the front-facing “photo side”).
- Step back every few minutes. If you see dark holes, weave lights deeper in those spots.
Step 4: Ribbon and Garland Layering (The Part That Makes People Say “WOW”)
Ribbon is the difference between “nice tree” and “how much did you pay someone to do that?” Wired ribbon holds shape, creates movement, and fills gaps where branches look sparse.
How much ribbon do you need?
It depends on how you style it. A quick rule: if you want big, dramatic ribbon moments, you’ll use more than if you do shorter tucked pieces. When in doubt, buy extrayou can always return unopened spools or use leftovers for bows, gift wrap, or that one chair that suddenly “needs a sash.”
Option A: Cascading ribbon “S” curves (beginner-friendly and gorgeous)
- Cut ribbon into pieces (roughly 12–24 inches) so you can create repeated “swoops.”
- Dovetail the ends (fold lengthwise and snip diagonally) for a clean finish.
- Tuck one end deep into the tree, bring the ribbon forward in a soft curve, then tuck again.
- Repeat around the tree, spacing pieces evenly and varying angles so it looks effortless.
Use blue velvet as your anchor layer, then add pink satin for softness, then a gold metallic ribbon as the “sparkle punctuation.”
Option B: Spiral wrap (classic, polished, and very “department store”)
- Anchor the ribbon near the top-back of the tree so the starting point isn’t front-and-center.
- Loop down in a gentle spiral, tucking ribbon into branches rather than wrapping tightly around the outside.
- Keep spacing consistent. Think “elegant drape,” not “tree got gift-wrapped.”
- Layer a second ribbon in a complementary spiral, slightly offset from the first.
Option C: Vertical ribbon drops (maximum drama, minimal circling)
- Cut several long ribbon lengths (mix lengths so it doesn’t look uniform).
- Tuck each piece at the top under the topper area, let it fall, then tuck and curve it around branches.
- Alternate colors: blue, pink, gold… then repeat.
Add garland without making it feel heavy
For this palette, gold bead garland or pearl garland looks stunning. Place garland after ribbon, weaving it slightly deeper so it peeks out. If you’re using two garlands (beads + glitter rope), keep one subtle and one sparkly so they don’t compete.
Step 5: Build Ornament “Zones” (So Your Colors Don’t Clump)
Here’s the trick that keeps blue from taking over the top while pink ends up awkwardly living at the bottom like it missed the memo: decorate in passes. Don’t hang one ornament at a time and wander emotionally. Choose a category, place it evenly around the tree, then move on.
Ornament order that creates depth
- Large ornaments first: place deep into the branches to create interior sparkle.
- Medium ornaments next: fill the mid-layer, balancing color distribution.
- Small ornaments last: sprinkle on outer tips and fill tiny gaps.
Color balancing cheat code
- Use blue as your grounding color (slightly more than pink).
- Use gold as your light reflector (spread everywhere).
- Use pink as the “surprise” (cluster in small pops, repeated often).
Finish mix ideas (so it doesn’t look flat)
- Blue: matte navy balls + shiny sapphire + a few glitter blue accents
- Pink: blush satin balls + rose-gold shimmer + pale pink glitter
- Gold: antique gold + champagne + bright metallic (in moderation)
Step 6: Add the Nutcracker Magic (Without Turning It Into a Toy Store Explosion)
Nutcracker is the themeso let nutcrackers be the stars, but not the entire cast. Think of your tree like a stage: a few main characters, plus supporting sparkle.
Nutcracker placement strategy
- Front-facing heroes: place 3–7 nutcracker ornaments or mini figures where people naturally look (mid to upper third).
- Depth trick: tuck one or two nutcrackers slightly deeper so you “discover” them when lights glow.
- Secure them: use ornament hooks, floral wire, or pipe cleaners so the soldiers don’t do a dramatic mid-December dive.
Easy DIY upgrades for nutcracker décor
- Gold nutcrackers: repaint older wooden nutcrackers with gold spray paint for a cohesive luxe look.
- Ballet accents: create “ballet slipper” ornaments with pale pink shoes, ribbon hangers, and sparkly embellishments.
- Sugar Plum details: add tiny ballerinas, snowflakes, or candy-inspired ornaments as subtle story nods.
Step 7: Picks, Sprays, and Florals (The Final 10% That Makes It Look 40% Better)
Picks are your gap-fillers and your texture builders. They’re also how you make a Nutcracker tree feel high-end without buying 400 ornaments. Use them like punctuation: not every sentence needs an exclamation point, but the right ones are fabulous.
Where picks look best
- Upper third: gold sprays and frosted stems create height and movement.
- Mid-layer: pink poinsettia picks or champagne florals soften the nutcracker “uniform” vibe.
- Near ribbon tucks: add a small pick where ribbon disappears into the tree to hide mechanics.
Step 8: Choose a Topper That Matches the “Story”
Your topper is the final headline. Pick one that supports your theme:
- Big bow topper: perfect for Sugar Plum Dream or Modern Ballet Luxe
- Gold star: clean and classic (great if you already have lots of nutcracker ornaments)
- Crown topper: instantly regal, especially with sapphire + antique gold
- Nutcracker topper: bold and playfuluse fewer nutcracker ornaments elsewhere so it doesn’t feel crowded
Pro tip: the bow topper that always photographs well
If you choose a bow, use wired ribbon and make it oversized on purpose. Let tails cascade down 1/3 of the tree so the eye travels downward. (Also: you’ll feel like you live inside a holiday movie, which is arguably the point.)
Step 9: Step Back, Edit, and “Even Out the Sparkle”
The difference between a good tree and a great tree is the last 15 minutes of editing:
- Walk around the tree and check every angle (especially if it’s visible from multiple rooms).
- Look for color clumps: if three pink ornaments are partying in one corner, relocate one.
- Fill dark holes with a small ornament, a pick, or a ribbon tuck.
- Make sure gold is distributed evenlygold is your light reflector and visual glue.
Troubleshooting: Common Problems and Fast Fixes
“My ribbon looks limp and sad.”
Use wired ribbon. Fluff it by gently pulling edges outward and giving it shape before tucking. If it’s unwired, convert it into bows or short accent pieces instead of long drapes.
“My colors feel random.”
Pick a dominant color (usually blue), a supporting color (gold), and an accent (pink). Then repeat the accent in smaller doses all around the tree. Consistency is what makes it feel curated.
“My nutcrackers are too heavy and keep falling.”
Don’t trust the tiny ornament hook alone. Use floral wire or a pipe cleaner to secure the piece to a sturdy branch closer to the trunk. Heavier ornaments belong slightly deeper in the tree where branches are stronger.
“It still looks flat.”
Add depth in three ways: (1) place some ornaments deeper, (2) add picks for texture, and (3) mix finishesmatte + shiny + glitter is the easiest upgrade.
Variations: Same Theme, Different Personality
Whimsical Sugar Plum
- More pink ornaments, candy accents, ballerinas, and playful shapes
- Gold mesh ribbon + blush satin ribbon + light blue accents
Elegant Regal Nutcracker
- Deep blue velvet ribbon, antique gold ornaments, fewer pink pieces (but still repeated)
- Nutcrackers in classic uniforms, plus jewel-tone touches
Modern Minimal Nutcracker
- Champagne gold + muted blue, with pink used only in bows
- Fewer ornaments, bigger statement pieces, lots of texture (picks + ribbon)
How to Store This Tree So Next Year You Don’t Hate Past You
- Store ornaments by color (blue/pink/gold) so setup is faster next season.
- Keep ribbon on spools and label them (trust me, “gold-ish” is not a helpful description later).
- Put your nutcracker ornaments in a dedicated bin with paddingfaces deserve respect.
- Snap 3–5 photos of your finished tree. Future you will worship current you.
Final Look Checklist
- Lights glow evenly from the inside
- Ribbon has shape (not just loops sitting on top)
- Blue, pink, and gold appear in every section of the tree
- Nutcrackers are featured, not overcrowding the design
- Picks add texture and hide gaps
- Topper matches the theme and feels intentional
Conclusion
A Blue, Pink and Gold Nutcracker Christmas Tree is equal parts cozy nostalgia and sparkling glam. When you decorate in layerslights, ribbon, ornaments, nutcracker moments, then picks and a bold topperyou get a tree that feels curated, playful, and photo-ready from every angle. And the best part? It still feels like Christmas: warm, whimsical, and just dramatic enough to deserve its own applause.
Experience Notes: What Decorating This Tree Feels Like in Real Life (The Fun, The Fumbles, The “Aha!” Moments)
Here’s the honest truth: the first five minutes of decorating a Nutcracker tree are pure confidence. You plug in the lights, you hold up a ribbon spool, and your brain immediately starts playing Tchaikovsky like you’re the director of a holiday ballet. You think, “This will be effortless.” And then… ribbon happens.
The most common experience with a blue/pink/gold palette is realizing how powerful gold is. Gold ornaments don’t just sit there looking pretty; they bounce light back into the tree like tiny disco balls with better manners. The first time you add gold beads or metallic ribbon, the whole tree suddenly looks more expensive, even if half your ornaments are from a clearance bin and one of your nutcrackers has a slightly crooked hat. (That hat gives him character. We’re keeping him.)
Another very real moment: you’ll discover that pink is an accent color with opinions. Too little, and the tree leans “regal winter” instead of “Sugar Plum.” Too much, and you’ve drifted into “pink party tree” territory. The easiest fix is repetition in small doses: a few pink bows spread around, a handful of blush ornaments near ribbon tucks, maybe one standout pink floral pick in the upper third. Pink looks best when it’s sprinkled like confettinot dumped like a paint bucket.
If you’re doing ribbon cascades, you’ll probably have a “why is this harder than it looks on the internet?” phase. Totally normal. The breakthrough is understanding that ribbon isn’t meant to lie politely on top of branchesit needs to be tucked into the tree so it looks like it’s weaving through the greenery. Once you start pushing ribbon deeper and shaping it into soft curves, everything clicks. Bonus: short ribbon sections are surprisingly forgiving. If one piece looks awkward, you don’t have to redo the whole treejust swap that one ribbon “swoop” and move on like a pro.
Nutcracker ornaments bring their own adventures. Some are lightweight and behave beautifully. Others are chunky little soldiers who believe gravity is a personal invitation. The first time a heavy nutcracker slides off a branch and bonks a lower ornament, you learn two things: (1) secure important pieces with wire, and (2) place heavier décor closer to the trunk where branches are sturdier. This also improves depth. A nutcracker slightly inside the tree looks like a hidden surpriselike the tree is telling a story instead of just showing off.
The most satisfying “aha” moment usually comes late in the process, when you add picks and sprays. Up until then, your tree might feel like it’s missing somethingeven if you’ve already spent an hour placing ornaments “evenly.” Picks fix that. A few gold leaf sprays near the top create height. Frosted stems add winter texture. Pink florals soften the uniform-and-metal vibe so the tree feels festive, not rigid. And picks are secretly great at hiding mechanics: ribbon ends, gaps, that one branch that refuses to fluff correctly… picks are basically tree makeup.
Finally: the topper decision is more emotional than people admit. Stars are classic. Crowns are regal. But a big bow topper? A big bow topper says, “This tree is dressed for the occasion.” If you’re nervous about going bold, try a bow with long tails. It instantly connects the top of the tree to the rest of the design, and it photographs ridiculously well. The only risk is that you’ll start putting bows on everything else in your house. The mirror. The dog (don’t). The fridge. The vibe spreads.
When it’s done, the best part of this theme is how it feels at night. Blue deepens, pink glows softly, and gold sparkles in every direction. It’s cozy and theatrical at the same timelike Christmas decided to wear a velvet jacket and show up fashionably early. And if your tree isn’t perfect? Congratulations. That means it looks like a real home decorated itbecause it did.