If you pulled off an old tile backsplash and now your wall looks like it lost a bar fight, welcome. Thinset is fantastic when it’s holding tile in place and deeply annoying when you want it gone. It bonds hard, dries like cement, and tends to take a little drywall dignity with it on the way out. The good news is that you can remove thinset from drywall without turning the entire wall into a demolition derby. The trick is knowing when to scrape, when to patch, and when to stop pretending this is a “small repair” and just replace the drywall.
This guide walks through the smartest way to remove thinset from drywall, repair the damage, and get the wall ready for paint, wallpaper, or a new backsplash. You’ll also learn the difference between thinset and mastic, which matters more than most people realize. One is a stubborn cement-based mortar. The other is more like a sticky adhesive with attitude. Treat them the same, and your wall may file a complaint.
What Thinset Is and Why Drywall Hates It
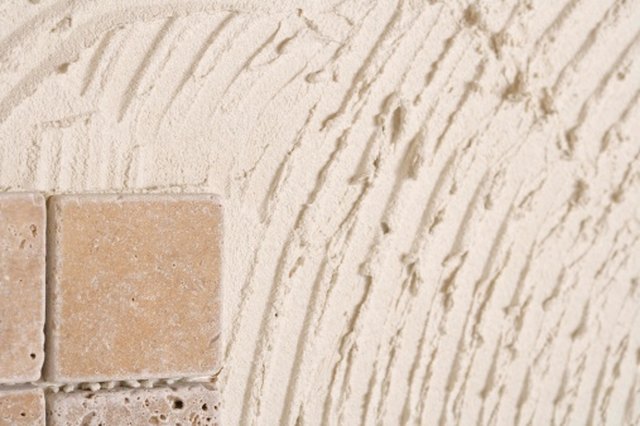
Thinset mortar is a cement-based tile adhesive used to bond tile to walls and floors. Once it cures, it becomes hard, brittle, and very durable. That’s wonderful for tile installation and less wonderful for the person trying to remove it later. Drywall, on the other hand, is a paper-faced gypsum panel. In other words, thinset is basically the strong friend, and drywall is the one who says, “I bruise easily.”
When you remove tile from drywall, the tile often breaks free unevenly. Some sections pop off cleanly, while other sections pull away drywall paper, gouge the gypsum core, or leave ridges of cured mortar behind. That is why thinset removal is rarely just about “scraping off the wall.” It usually becomes a combination of careful removal and surface repair.
Should You Remove the Thinset or Replace the Drywall?
Before you start swinging tools around like a weekend warrior in an action movie, stop and assess the wall. In many cases, the smartest DIY move is not removing every last bit of thinset. It is removing the high spots, repairing the damage, and making the wall flat again.
Scrape and repair if:
- The thinset is thin, patchy, or only left in small ridges.
- The drywall paper is mostly intact.
- You only need a smooth enough surface for paint or a light backsplash.
Knock down and skim coat if:
- The wall has widespread residue, but it is not extremely thick.
- The drywall has shallow gouges or paper tears.
- You want the fastest path to a flat, attractive finish.
Replace the drywall if:
- Large areas of face paper are torn off.
- The gypsum core is crumbling.
- The wall has water damage, mold issues, or deep impact damage.
- The thinset is thick over most of the wall and scraping it would take forever.
That last option sounds dramatic, but sometimes replacing drywall is faster, cleaner, and more professional-looking than trying to rescue a wall that has already emotionally checked out.
Tools and Materials You’ll Want Nearby
- Drop cloths or rosin paper
- Safety glasses
- Work gloves
- N95, P95, or better dust protection for dusty removal work
- Putty knife or drywall knife
- Rigid scraper or carbide scraper
- Utility knife
- Shop vacuum with dust control if available
- Sanding sponge or fine-grit sandpaper
- Setting-type joint compound for deeper repairs
- Ready-mix joint compound for finish coats
- Drywall primer
- Replacement drywall patch if needed
An oscillating multi-tool with a scraper blade can help in some cases, but use it gently. Power tools can go from “helpful” to “why is there a crater in my kitchen wall?” very quickly.
How to Remove Thinset From Drywall Step by Step
1. Clear the area and protect everything
Take down outlet covers, move small appliances, and cover countertops, floors, and nearby cabinets. If you’re working around outlets or switches, turn off power at the breaker first. Drywall and mortar dust have a magical ability to travel farther than seems physically possible, so protect more than you think you need to.
2. Confirm that it’s actually thinset
This matters. Thinset is hard, cement-like, and usually gray or white. Mastic is often softer, tackier, and more adhesive-like. If the residue softens noticeably with heat or solvent, you may be dealing with mastic, not cured thinset. True thinset usually needs mechanical removal, not chemical persuasion.
3. Start with a test patch
Pick a small, less visible section and try scraping with a stiff putty knife or drywall knife. Hold the blade at a low angle and work under the edge of the mortar. Your goal is to remove the high spots, not excavate the wall like an archaeologist hunting for ancient backsplash remains.
If the mortar flakes off while the drywall stays reasonably intact, keep going. If the drywall face paper immediately starts tearing and the wall turns fuzzy, stop and switch to a strategy of knocking down only the proud ridges and repairing the surface later.
4. Remove loose and raised thinset first
Focus on the obvious bumps, ridges, and chunks. These are the areas most likely to telegraph through paint or make new tile sit unevenly. Work in short passes. Do not stab at the wall. Do not pry from the center outward like you’re opening a treasure chest. Gentle, controlled scraping is the winning move.
5. Shave stubborn high spots carefully
For areas that resist a hand scraper, you can use a carbide scraper or an oscillating multi-tool with a scraper blade. The key word here is carefully. The more aggressive the tool, the more likely you are to gouge the drywall. Remove what sticks up. Leave what is flat and firmly bonded if it is not causing a problem.
6. Avoid soaking the wall
Some people assume water will dissolve thinset. Once cured, thinset does not simply melt away. Overwetting drywall can weaken the paper face and make a bad day worse. A lightly damp sponge is fine for dust cleanup later, but do not treat the wall like a driveway you’re power-washing.
7. Cut away badly damaged sections
If scraping reveals deeply torn paper, crumbling gypsum, or holes, cut out the damaged area with a utility knife and patch it with new drywall. This is especially smart when one section is so rough that patching would require half a bucket of compound and a small prayer circle.
8. Repair torn drywall paper and gouges
Once the loose mortar is gone, remove any loose or bubbled drywall paper. Then apply a thin skim coat of joint compound over damaged areas. For deeper gouges, setting-type compound is often the better choice because it hardens faster and shrinks less. Feather the edges out wide so the repair blends into the surrounding wall.
After it dries, scrape or sand lightly, then apply a second coat if needed. Thin coats win here. Thick coats look productive for about ten minutes and then start cracking, shrinking, or mocking your optimism.
9. Sand lightly, not aggressively
Use a sanding sponge or fine-grit sandpaper to smooth joint compound, not to grind away large amounts of thinset. Sanding cured mortar can create a lot of dust and often does less than you hope. Fill low spots with compound; do not try to sand your way to a perfect wall from a bad starting point.
10. Prime before the final finish
Once the wall is flat and dry, apply primer. This is especially important if drywall paper was torn or repaired with compound. Primer helps seal porosity differences so the finished paint or backsplash installation looks even instead of patchy and suspicious.
The Best Method for Different Wall Conditions
If the thinset is only in small patches
Scrape the patches flush, touch up with joint compound, sand lightly, and prime. This is the easiest scenario and the one that lets you feel unusually powerful by lunchtime.
If the wall has lots of thinset but it’s mostly low-profile
Knock down the highest points and skim coat the entire area. This often produces a better final result than trying to remove every last molecule of mortar.
If the wall is shredded
Replace the drywall section. Seriously. Sometimes wisdom sounds like, “Nope, we’re not saving this.”
Common Mistakes to Avoid
- Using too much force: If you’re tearing the drywall faster than you’re removing mortar, you’re losing.
- Trying to dissolve cured thinset with water: That usually harms drywall more than the mortar.
- Skipping dust protection: Mortar and drywall dust are not something you want in your lungs.
- Over-sanding the wall: Sand compound lightly; do not turn the room into a chalk storm.
- Ignoring damaged paper: Loose paper needs to come off before patching or it can bubble later.
- Forgetting the final primer: Unprimed repairs often flash through paint.
Can You Tile Over the Wall Again?
Yes, if the wall is sound, dry, and flat enough for the new finish. For a kitchen backsplash in a dry area, repaired drywall can often be reused once it is properly smoothed and prepared. For wet areas such as inside a shower, drywall is not the right tile substrate. In those cases, use the appropriate backer board or approved tile substrate instead of trying to make damaged drywall do heroic things it was never designed to do.
Quick FAQ
Will a heat gun help remove thinset from drywall?
Usually not much. Heat is more useful for some adhesives and peel-and-stick materials. Cured thinset is mortar, not soft glue.
Can I use an angle grinder?
You can, but it is usually a bad idea indoors on drywall unless you have excellent dust control and real experience. It creates a huge amount of dust and can destroy drywall quickly.
What if the wall only needs to look good enough for a new backsplash?
You still need it flat. New tile will not hide major humps and craters. Remove the high spots, patch the damage, and create an even surface.
What if I’m not sure whether it’s thinset or mastic?
Do a small test. If it acts soft, gummy, or responsive to heat, it may be mastic. If it acts like stubborn cement, congratulations, you have thinset.
Conclusion
Removing thinset from drywall is absolutely doable, but it is rarely a “scrape for five minutes and call it a day” type of project. The most effective approach is usually a hybrid one: remove the loose and raised mortar, stop before you destroy the drywall, and then repair the wall with joint compound or replace sections that are too far gone. That gives you a flat, paint-ready, or tile-ready surface without wasting hours chasing perfection with a scraper.
If you remember only one thing, make it this: do not judge success by how much thinset you removed. Judge success by how flat and sound the wall is when you’re done. Your future paint job, backsplash, and sanity will all appreciate the distinction.
Real-World Experiences With Removing Thinset From Drywall
People who take on this job for the first time usually begin with confidence and a putty knife. Then the first chunk of tile comes off, followed by a patch of paper, a dusty sigh, and the sudden realization that walls are somehow both strong and fragile. That mix of frustration and progress is common. One section will scrape cleanly and make you feel like a renovation genius. The next section will cling to the wall with the loyalty of a golden retriever and leave behind a crater the size of a pancake.
A very common experience is discovering that the project changes halfway through. Homeowners often start out thinking they are removing adhesive, but the real job becomes wall repair. The moment the drywall paper tears, priorities shift. Instead of obsessing over every thinset stain, experienced DIYers begin focusing on surface flatness. That mental shift saves time. It also saves the wall from unnecessary damage. In real projects, the best results usually come from people who stop trying to win the scraping contest and start planning a clean repair.
Another thing people notice is how different one wall section can be from the next. Near the stove, the tile may pop off surprisingly well. Near the sink, old moisture exposure may have weakened the drywall paper. Around outlets, the cuts behind the tile can create weird weak spots. Corners are often the most irritating part because tools do not sit flat and the wall seems determined to keep at least one ugly ridge just to stay memorable.
Dust is another universal lesson. Nearly everyone underestimates it. Mortar dust, drywall dust, and random mystery grit from behind the backsplash can spread fast. Many people say the cleanup takes almost as much patience as the removal. This is why experienced remodelers isolate the area, vacuum often, and resist the urge to “just quickly sand this one thing” without protection. That quick sanding session has a way of becoming a full-room snow globe.
There is also a pattern in how people feel about drywall replacement. At first, replacing drywall sounds extreme. Then they spend two hours scraping a wall that still looks rough, and suddenly cutting in a clean patch sounds elegant and wise. That is not failure. That is progress. Many successful remodels look messy in the middle. The trick is recognizing when the cleanest final result comes from replacing a bad section rather than fighting it indefinitely.
Perhaps the most useful real-world takeaway is this: perfection is not the goal, flatness is. Walls do not need to be spiritually healed. They need to be sound, smooth, and ready for the next finish. Once homeowners understand that, the project gets easier. They scrape the high spots, repair the damage, prime the surface, and move on with life. And honestly, that may be the greatest DIY victory of all.