A blank wall has potential, but it can also have the personality of an unbuttered slice of toast. A wall stencil is one of the easiest ways to give a room color, rhyt paste, pattern-matching anxiety, or the emotional roller coaster of removing wallpaper later.
This stencil a wall tutorial walks you through every stage of the project, from choosing a pattern and preparing the surface to avoiding paint bleed and handling those awkward corners that seem designed by a mischievous architect. Whether you want a soft botanical bedroom wall, a bold geometric accent wall, a nursery pattern, or a dramatic entryway, wall stenciling can create a polished result with a little patience and a surprisingly small amount of paint.
The secret is not painting faster. The secret is painting lighter. Think “barely there” rather than “I have poured my entire soul into this roller.”
Why Stencil a Wall Instead of Using Wallpaper?
Wall stenciling gives you the decorative impact of wallpaper while offering more flexibility. You choose the paint color, spacing, contrast level, and coverage. You can stencil an entire room, create one dramatic accent wall, add a border near the ceiling, frame a reading nook, or repeat a design behind open shelving.
Unlike wallpaper, a stenciled wall can be refreshed with paint when your style changes. That makes it especially appealing for renters with permission to paint, homeowners updating a dated room, or anyone who has ever purchased patterned wallpaper and immediately wondered whether they had made a bold design decision or joined a circus.
Benefits of a Stenciled Wall
- Creates a custom wallpaper look with paint.
- Allows more color flexibility than preprinted wallpaper.
- Works for accent walls, full rooms, borders, and small decorative zones.
- Can be more budget-friendly than purchasing multiple wallpaper rolls.
- Lets you adjust the contrast from subtle texture to dramatic pattern.
- Makes use of leftover interior paint or sample-size paint pots.
- Can be painted over later without scraping adhesive off the wall.
What You Need to Stencil a Wall
Gather your supplies before opening the paint. Stenciling is easier when everything is within arm’s reach, especially because stepping off a ladder with a wet roller in one hand and a stencil in the other is a tiny home-improvement circus act nobody requested.
Wall Stenciling Supplies Checklist
- Reusable wall stencil
- Interior latex or acrylic paint
- Base wall paint, if repainting the wall first
- Stencil brush, foam roller, or small dense nap roller
- Small paint tray or disposable plate
- Painter’s tape
- Repositionable spray adhesive, optional
- Level or laser level
- Measuring tape
- Pencil and eraser
- Drop cloths
- Clean cloths, baby wipes, or damp paper towels
- Step ladder for upper wall sections
- Fine-detail artist brush for touch-ups
- Paper towels or cardboard for unloading excess paint
Choose the Right Stencil Pattern for Your Room
Before you learn how to stencil a wall, choose a design that works with the room’s scale. A large pattern can make a spacious room feel intentional and stylish. The same large pattern can make a tiny powder room feel as though the walls are trying to start a conversation.
Small, repeating designs work well in bathrooms, hallways, nurseries, and compact bedrooms. Large Moroccan, botanical, trellis, or geometric stencils are often better for accent walls, dining rooms, living rooms, and taller spaces.
Popular Wall Stencil Ideas
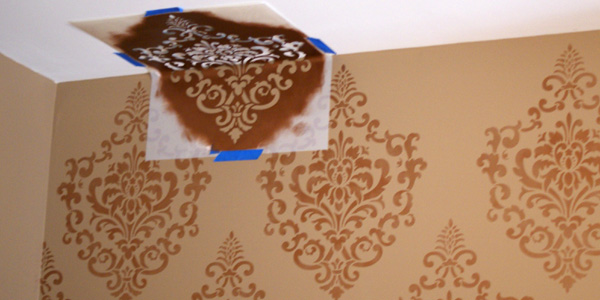
- Damask patterns: Traditional, romantic, and elegant for bedrooms or formal dining rooms.
- Geometric wall stencils: Great for modern spaces, offices, and playful accent walls.
- Botanical stencils: Ideal for nurseries, powder rooms, and cottage-inspired interiors.
- Moroccan tile patterns: Add movement and an old-world feel to kitchens, bathrooms, or entryways.
- Scallops and arches: Soft, cheerful, and especially popular in children’s rooms.
- Minimal line patterns: Best for subtle texture in neutral or contemporary rooms.
For a sophisticated look, use two colors that are close together in value, such as warm white with pale beige, dusty blue with muted navy, or soft sage with olive. For a more dramatic statement, choose stronger contrast, such as charcoal over cream, navy over white, or terracotta over blush.
Prepare the Wall Before Stenciling
Preparation is the part everyone wants to skip, right up until they see a lovely floral stencil pattern printed beautifully over a mystery streak of cooking grease. Clean, smooth walls create the sharpest results.
Step 1: Clean the Wall
Remove dust, fingerprints, residue, and surface grime with a mild cleaner or a damp cloth. Let the wall dry completely before applying paint. In kitchens, laundry rooms, and high-traffic hallways, spend extra time cleaning areas near switches, door frames, and corners.
Step 2: Repair Imperfections
Fill nail holes, dents, and small cracks with spackling compound. Once dry, sand lightly until smooth. Wipe away sanding dust before painting. A stencil will not hide a crater, a rough patch, or the evidence of that one time someone tried to hang a shelf using pure optimism.
Step 3: Paint or Refresh the Base Coat
If the wall needs a new base color, paint it first and allow it to dry thoroughly. A smooth flat or eggshell base coat is often easier to stencil over than a very glossy surface. Higher sheen surfaces can make it easier for fresh stencil paint to slide under the stencil edges.
Give the base coat adequate drying time according to the paint label. Waiting at least a full day before stenciling is a sensible rule for most interior projects, especially when the room is humid or poorly ventilated.
How to Stencil a Wall Step by Step
Step 1: Practice Before You Touch the Wall
Use a piece of poster board, cardboard, or an old board to test your stencil, paint color, roller pressure, and coverage. This is where you learn the most important lesson in all of stencil painting: less paint is almost always better.
Practice until you can create a clear design without fuzzy edges. Test one light coat, then see whether you need a second pass. Do not judge the color only while it is wet; paint often dries slightly differently.
Step 2: Plan the Starting Point
For an all-over wallpaper effect, start near the top center of the wall and work outward. Beginning in the center helps distribute partial stencil sections more evenly near both edges of the wall.
For a feature wall behind a bed, sofa, or desk, center the first stencil over the focal point. For a border, use a level line to guide the first row. Your first stencil placement matters because every repeated pattern will follow its lead like tiny painted ducklings.
Step 3: Mark a Straight Reference Line
Use a level or laser level to draw a faint horizontal or vertical guide line. Position your stencil along this line before taping it down. Check the stencil’s built-in registration marks if it has them. These small alignment points make it easier to repeat the pattern without creating a slow-motion visual landslide.
Step 4: Secure the Stencil
Use painter’s tape around the outer edges of the stencil. For larger or more detailed patterns, a light mist of repositionable spray adhesive on the back can help hold the stencil flat against the wall.
Make sure the stencil lies flush against the wall. Any lifted edge is an open invitation for paint to sneak underneath and turn a crisp design into a fuzzy rumor.
Step 5: Load Your Roller or Stencil Brush Lightly
Pour a small amount of paint into a tray. Load your foam roller or stencil brush, then remove most of the paint by rolling or blotting it repeatedly on a paper towel, cardboard, or dry section of the tray.
Your tool should look almost dry. It should not drip, glisten heavily, or feel like it has important news to share with the floor.
Step 6: Apply the Paint With Gentle Pressure
Use a light rolling motion with a dense foam roller, or gently pounce paint through the stencil with a stencil brush. Avoid scrubbing back and forth aggressively. Heavy pressure pushes paint under the stencil edges and causes bleed-through.
For the cleanest result, build coverage in light layers. If the first pass looks faint, add another light pass while the stencil remains in place. It is much easier to deepen a pale design than to remove a blob of paint that has escaped into the wild.
Step 7: Remove the Stencil Carefully
Peel the stencil away slowly from one corner. Do not yank it off like you are removing a bandage after a questionable backyard injury. Lift gently and keep it from brushing against the freshly painted section.
Inspect the result immediately. If a small area needs attention, use a tiny artist brush after the paint dries. Resist the urge to “fix” every microscopic imperfection while the paint is wet. A design that looks imperfect from six inches away often looks fantastic from across the room.
Step 8: Align the Next Repeat
Move the stencil to the next position. Match the registration marks or overlap points with the portion of the pattern you already painted. Tape the stencil, check it with your level, and repeat the dry-roller method.
Work slowly through the first few repeats. Once you establish a rhythm, the project becomes much easier. The pattern starts to connect, the wall starts to transform, and suddenly your once-boring room begins behaving like it has a design budget.
How to Stencil Around Corners, Ceilings, and Outlets
Inside Corners
For inside corners, let the stencil bend gently into the corner if the plastic is flexible enough. Secure one side with tape, press the stencil carefully into the corner, and use a nearly dry brush for better control. Do not overload the roller here; corners are where paint bleed likes to hold meetings.
Ceilings and Baseboards
When the stencil reaches the ceiling or baseboard, tape off the trim and stencil only the visible part of the design. Partial patterns are normal. A well-placed partial motif looks intentional, especially when the rest of the wall is aligned properly.
Outlets and Light Switches
Turn off power if necessary, remove the cover plate, and stencil around the opening carefully. Use painter’s tape to protect the electrical box area. A small stencil brush is usually easier than a roller in tight sections.
Common Wall Stenciling Mistakes and How to Fix Them
Paint Bleeding Under the Stencil
Cause: Too much paint, too much pressure, or a stencil that is not flush against the wall.
Fix: Remove excess paint from the roller or brush, secure the stencil more tightly, and apply paint in lighter coats. Touch up dry mistakes with the base wall color and a small artist brush.
Pattern Looks Crooked
Cause: Skipping the level, rushing the registration marks, or trusting your eyeballs after three hours on a ladder.
Fix: Stop and recheck alignment frequently. Use a laser level if possible. It is faster to correct one slightly off section than to discover the entire wall has begun leaning toward Tuesday.
Stencil Paint Looks Patchy
Cause: Paint was applied unevenly or the first pass was too light.
Fix: Apply a second light coat before removing the stencil. Use a consistent pouncing or rolling motion and reload your tool carefully.
Stencil Gets Clogged With Paint
Cause: Paint buildup around delicate cutout areas.
Fix: Clean the stencil periodically with warm water and mild soap, then dry it before continuing. Keeping the stencil clean prevents blurry edges and protects fine details.
Design Ideas for a Stenciled Accent Wall
A stenciled wall does not need to cover every inch of the room. Sometimes a smaller application creates the strongest effect.
- Stencil behind a bed to create a painted headboard wall.
- Add a repeating pattern inside a dining room nook.
- Create a soft tone-on-tone pattern in a home office.
- Stencil a children’s room with stars, clouds, arches, or woodland shapes.
- Use one large floral motif behind open shelves.
- Add a border above chair rail height in an entryway.
- Stencil the wall behind a bathroom vanity for a tile-inspired look.
- Create a subtle geometric pattern behind a television or media console.
How to Care for a Stenciled Wall
Allow the wall to dry and cure according to the paint manufacturer’s instructions before cleaning it. Avoid scrubbing the surface immediately after the project. Once cured, dust gently with a microfiber cloth or wipe lightly with a damp sponge and mild soap.
Keep a small labeled container of both the base color and stencil color for future touch-ups. This is especially helpful in hallways, kids’ rooms, and areas where backpacks, pets, furniture corners, or enthusiastic dance moves occasionally make contact with the wall.
The Experience of Stenciling a Wall: What the Project Really Feels Like
Stenciling a wall is one of those home projects that looks suspiciously easy in a two-minute video. The person in the video has a spotless room, perfect lighting, a fresh roller, and somehow no paint on their elbow. In real life, the experience is more human. There is measuring. There is standing back from the wall every ten minutes. There is at least one moment when you wonder whether the pattern is brilliant or whether you have accidentally painted a very expensive wrapping paper design across your bedroom.
The first few stencil repeats are usually the slowest. You are learning how much paint belongs on the roller, how firmly the stencil needs to sit against the wall, and how carefully the registration marks need to line up. At first, every placement feels important because it is important. The first row becomes the map for the entire design. Once the pattern starts repeating, however, the project becomes calming. Tape, check, roll, peel, move. Tape, check, roll, peel, move. The rhythm is almost meditative, provided you do not look down and discover that your socks have become part of the paint project.
Many people are surprised by how dramatic the transformation becomes before the wall is even finished. A few repeated motifs can make a plain room feel taller, softer, more playful, or more collected. A subtle neutral stencil may not shout for attention, but it adds texture that changes throughout the day as natural light moves across the wall. A high-contrast pattern can make a simple room feel theatrical in the best way, like it has suddenly developed opinions about throw pillows.
The most satisfying moment usually arrives after the final stencil is removed. The pattern connects from one side of the wall to the other, the partial edges near the ceiling look intentional, and the room finally feels different. Not just painted. Designed. That difference is why wall stenciling remains such a rewarding DIY project. It combines the practical simplicity of paint with the visual richness of wallpaper, while still leaving room for personality.
There will probably be small imperfections. One motif may be slightly lighter. A corner may need a touch-up. A tiny paint bleed may exist in a location no visitor will ever notice unless they arrive carrying a magnifying glass and a deeply concerning amount of free time. Those imperfections are part of the handmade finish. They prove the wall was created with care rather than printed in a factory.
The best experience comes from accepting that perfection is not the goal. Consistency, patience, and overall impact matter more. Step back often. Look at the wall from the doorway. Let the pattern settle into the room. Once the furniture is back, the art is hung, and the light hits the design at the right angle, you may find yourself staring at the wall with the quiet pride usually reserved for successfully assembling furniture without leftover screws.
Note: For the best results, test your paint, roller pressure, and stencil placement on a practice surface before beginning the full wall. A few minutes of testing can prevent hours of touch-up work.
Conclusion
A wall stencil is an approachable way to create a custom, wallpaper-inspired finish without the cost or commitment of traditional wallcovering. With a clean wall, a level guide, a reusable stencil, and a nearly dry roller or brush, even beginners can create a polished patterned wall.
Take your time with alignment, use thin paint layers, and do not panic over tiny flaws. A stenciled wall is meant to have character. When the last repeat is finished, you will have more than an accent wallyou will have a room that feels personal, memorable, and far less like a slice of undecorated toast.